Sunday, July 29, 2012

Farmhouse Project WIP - Update 9 - Roof Tin

Tinning the roof has begun.  Below are some of the tools I'm using for the job:

On the top left is an orbital sander that I borrowed from a friend of mine.  With all the use I've gotten out of it, I probably should just buy him a new one...  I did buy a new set of sand paper so I'll at least return it to him in good condition.  The sander is used to remove the printing on the tin and rough up the other side as well to give the glue and eventually paint something to grab on to.

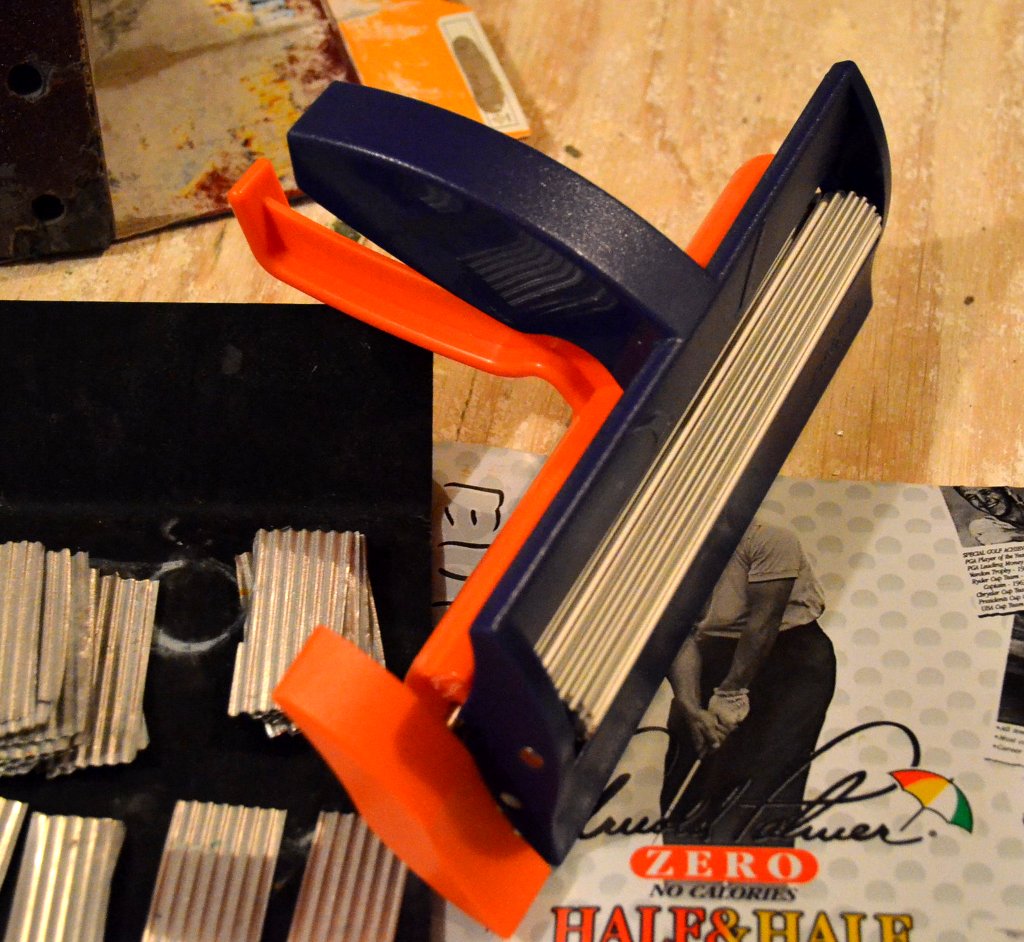
Here is the Fiskars Paper Crimper. It creates the nice corrugated pattern in the tin.  Under the crimper is the tin from the can of an Arnold Palmer drink.  It is a favorite drink of my parent-in-laws.  Although a little taller than a standard 12oz can of soda, both work equally as well.  Not pictured, a Kitchen Shears similar to the one linked, was used to cut the beverage container apart.  Do not use the household shears for this!  Cutting tin isn't its designed function and although it will cut dozens/hundreds of cans apart without fail, it will be significantly traumatized by the experience and will never cut the same again.  If you do have one in the kitchen, you might consider buying a new one and swapping it out for the old one.  The old one can then migrate to the hobby tool chest and the kitchen can take advantage of a shiny brand new one.  Win-win for all involved. ;)

Moving on, the glue I use for this step is Gorilla Super Glue. It is less expensive per ounce than the Loctite I use for gluing the balsa together, has more working time, and forms a little better bond between the tin sheets.  The extra working time requires the use of clamps and clothes pins to keep the pressure on the pieces long enough for the bond to form.  I highly recommend wearing disposable gloves and a respirator when working with the Gorilla Glue.  I happen to be somewhat allergic to the fumes so the 3M Respirator I purchased allows me to work with the stuff safely.  Getting the glue stuck to my fingers (which is inevitable when working with so much of it for so long) is extremely irritating and painful to get off so the gloves are a big help.  Plus, the gloves help prevent getting poked and cut by the sharp edges of the tin.  Ok, enough talk about safety equipment...

Applying the bottom row of tin.  I've started on two sides to allow me to trade back and forth as one piece dries, I can work on the other side.  It normally only takes 30 seconds or so for the glue to grab, but sometimes I get a little carried away and put too much glue on which takes a few minutes to set up...


About half of the first row is done in this photo.  The black clamps shown in the photo are extremely helpful in working on the second and subsequent rows.  Their long reach and point pressure makes the tin so much easier to deal with.  Specifically, they are Wolfcraft QUICK-JAW Needle Nose Spring Clamps.  I got mine from Menards.

Here the bottom layer of tin is complete.  It took about two hours to go from tin can to the first layer glued down.

The round black things on the right side of the frame are magnets.  Another pair of them are on the underside of the roof.  They are working to press together a particularly troublesome pair of tin sheets long enough for the glue to set up.


So far the roof is shaping up quite nicely.  Another couple hours and it should be all tinned up.  Most likely I'll forget to leave a hole for the chimney, but I'm hoping that writing it here will help me to remember. ;)

Farmhouse Project WIP - Update 8 - Roof Framed

The 'hard part' is done - framing the roof.  Ok, so it really wasn't that difficult, but it certainly wasn't an exact science.  The Sketchup drawing helped out to give some hints on how long the beams should be, but due to slight variations in wall length and alignment along the way, some trial and error was needed.  Fortunately there is a little wiggle room when getting things lined up given the flexible nature of the metal roof.

The beam seen down on the floor of the building was previously attached to the bottom of the roof peak.  It was used to keep the correct roof height which was sort of the constant value used in getting the rest of the roof pulled together.


As can be seen along the bottom edges of the walls are going to be what I believe are rain gutters.  The walls along the concrete areas in the source photo seem to be tarred or somehow sealed against water penetration.  That should add some interest to the long stretches of brick.


To hold the balsa wood frame together, I use Loctite Super Glue Control Gel.  It dries very quickly (too quickly sometimes) and forms a solid bond.  Trying to do this with white glue would make it very difficult to get things put together in any reasonable amount of time.  If I had the tin ready, I could have begun attaching it about 10 seconds after as I glued the last cross timber in place.


Next getting some tin on and remembering to leave space for the chimney is on the todo list.

Thursday, July 26, 2012

Farmhouse Project WIP - Update 7 - Experiments Followup

Well, lots of 'error' in my 'trial and error'.

The resin window experiment flopped in more than one way.  First, the resin somewhat sticks to the wax paper which leaves some paper residue on the back of the window ruining their clarity.  Second, the resin sticks - a lot - to the double-stick tape.  That one didn't surprise me I guess...although I had some hope since the silicon didn't stick to it at all.  The wax paper frames both suffered from seepage of the resin under and out of the frame.  Although it was easy to trim off when still semi-soft, it still left a thin sheet of clear resin on the back side of the frame - exactly what I was trying to avoid.  There is another test I'll likely try with the resin to avoid the seepage, but the transparency option is gaining favor.

Ok, on to the painting tests.  So far I've got four options painted up.  None of them strike me as 'that is the one', but a at least one looks promising.

Below are a few photos.  Keep in mind you can click on the photos to expand them for a more detailed view.  Pardon the odd wall shapes...as I mentioned before, these were poured with extra plaster as I was casting the walls. 

The option below has no pigment in the mortar lines at all.  This option actually looks a little better than the photo shows, but it still leaves something to be desired... 
Country Gray base, red/browns sponged on, sepia wash to bring it together

The option below used Gray pigment in the mortar lines.   I didn't seal this one before applying the pigments which resulted in the gray pigment sort of overpowering the brick face colors...  It looks kind of interesting and has an 'old brick wall' feel, but does not match brick on the house I'm looking for.

Country Gray base, black wash, red/browns sponged, Slate pigment

The example below is actually three variations on the same base coat.  The left has the white pigment pressed in to represent the mortar, the center is no pigment, the right is gray pigment.  Even though I sealed this piece before applying the pigments, they both really overpowered the brick color.  To me, the white is too light and the gray is too dark.  I actually kind of like the center portion where there is no pigment, but it still doesn't look quite right.
Country Gray base, red/browns sponged, sepia wash, white pigment left, slate pigment right

The final option so far is the one I believe that best represents the original house.  The left 2/3 has a Sandstone base coat with the standard red/brown sponging plus some single bricks picked out in highlight colors.  The right 1/3 has a Mudstone base coat (a bit darker than the sandstone) with the same paint scheme as the left portion.

It still looks a little 'chalky' even though I sealed the piece before applying pigments.  Maybe a thicker coat of sealer would help.  I tried wiping as much of the pigment off the tops of the bricks as I could with a wet paper towel, but it wasn't entirely successful.  The grout pigment is a mixture of about 2 parts slate, 1 part white.

Anyway, I guess I'm leaning towards the sandstone side, although it may be interesting to paint random areas with the darker Mudstone to give some variation in color.  The two seem to blend pretty well.

Sandstone(left 2/3)/Mudstone(right 1/3), red/brown sponge, sepia wash, gray/white mix pigment
same as above except without the flash on


Below are some photos of the house I'm modeling after.  Keep in mind that the walls of the house are a little more uniform and may better represent the original brickwork.  The test pieces are from a different mold I'll be using for another set of related buildings.  I think the last option above best represents the top left photo on the wall (where the kids are hanging out).


Images from http://www.nrzam.org.uk/BobEglinton/BobLHS.htm
Well, more than ever I could use some feedback on these options.  I'm too close to the problem to see clearly at this point...  Figuring out how to get rid of some of the 'chalky' look would be ideal I think.  Alternatively, I could scrap all of these tests and try something completely new.

Tuesday, July 24, 2012

Farmhouse Project WIP - Update 6 - Experiments

Not a whole lot to report other than the wall seams have been filled with clay.  I'll try to get a close-up photo at some point.  They came out pretty well and certainly should blend right in once painted.

A couple painting tests are in progress, but not much to show with them yet.  I've not found anything that really works yet, but there are still a couple more experiments I have in mind that could be promising.  Once I get something that passes the first glance test, I'll get something posted on here.

Painting isn't the only experiment going on.  Using Envirotex Lite Pour-On Resin, a couple of the window panes have been filled with 'glass'.  The panes haven't been painted as they will need to be before doing the real thing since the purpose is to just get a feel for how to use the product.  It is good practice to try out unfamiliar materials before using them on a piece of terrain that you've got some time invested in.  It turns out you really don't need much resin at all to cover each pane.  The large pane I tried has way too much resin and it started seeping out from under the frame.  Two frames were simply placed on wax paper - we'll see if the other one seeps under as well.  The third frame in this test was secured down with double-stick tape to help prevent the under-seepage.  In another day or so we'll know if that was a good idea or if the resin reacts poorly with the tape.  That is the only obvious drawback so far to this product - it takes 24 hours to set up and another couple days to fully cure.  The odor is very low and there is plenty of pot life to work with so as long as patience and schedule permit, this stuff isn't so bad.

Sorry for the boring update  - I'll add some photos in to this post before too long...

Saturday, July 21, 2012

Farmhouse Project WIP - Update 5 - Walls up


After noticing that the front wall was about 1/16" too tall on one side and the front picture window was a bit messed up, I decided to re-master the front wall.  I had set aside the original master mold so the work wasn't too bad.


After an accelerated drying behind the dehumidifier, the windows of this piece and the rest were carved out a bit to allow the frames to fit.  For the most part that just consisted of carving off the brick texture in the area around the window near the inside of the wall. 
It was finally time to assemble the walls...I was a bit nervous as to how things would line up with all of the corners and if I was going to have a 1/2" gap when the first and last  pieces came to match up.  By a minor miracle, the walls lined up perfectly.  
The walls are based on 1" pink foam mounted on 1/4" MDF.  To glue the walls down I used Liquid Nails which does a pretty good job of holding pretty much anything together - even to the non-porous pink foam.  I did rough up the foam a little bit where the walls would actually be glued to give the glue a better hold.  The corners themselves were glued together with Aleene's Tacky Glue which bonds the porous dental stone quite securely.

At this point, you can still see very small gaps at the corners of the walls.  Before starting this project, I made some test pieces and after applying a little Crayola Air-Dry Clay, the corners look seamless.  Once the glue in the walls is fully dry, I'll apply it to the model and that should make the seams disappear.
Gluing the pieces down to the base only took about 10 minutes.  The 45 degree angle block worked like a charm leaving me with very little trimming to do to get a good fit.  To keep things in proper alignment, I used some carpenter's squares and Lego Ls in the corners to ensure an accurate 90 degree angle.

I plan on adding a Rhodesian Boiler (aka Donkey) near the wall with the small window on the right.  The Rhodesian Boiler is a brick structure that wood, corn cobs, or other combustibles were burned in to heat the water in a 44 gallon drum.  Using a series of pipes, hot water under a bit of pressure was provided for bathing.  From what I've heard these were very common and should add some nice flavor and give a hint of location to the finished piece.
 
Next on the to-do list is to fill the seams as I previously mentioned.  After that it will be time to do some paint tests on some scrap pieces I cast using excess plaster from the wall sections.  Normally I can estimate pretty well how much plaster to mix up, but I didn't want to leave it short given the risk of messing up the temporary Plasticine mold.  Yes, another layer of plaster could be poured over the first as it set up, but that can leave some strange patterns...  In any case, I knew I'd need some scrap pieces to use to practice painting so they wouldn't be a complete waste.


The final angled view is similar to that of the original reference photo.  It is a little to high of an angle perhaps, but close enough for now.


Not an exact match, but I can see the resemblance.  Once the roof, frames, and little awning is on I think it would be recognizable as representing part of this particular house.


The masters and molds for the door and miscellaneous window frames are on the left.  On the right are the mold and pieces for the shuttered windows separate from the frame to allow me to model the windows open as seen in the reference photo.  Most of the cast pieces seen in the photo still need to have the holes for where the panes of 'glass' will be.  The door will actually have the bottom two panels left as solid while the top two will be trimmed and filled with clear resin.

I'm getting more comfortable with using the Amazing Casting Resin and really like how easy it is to replicate pieces.  Even though I only need a couple doors and one of each of the small windows, I figured I could use them on future models.  In addition, if anyone actually wants to buy some sort of 'kit' of this house at some point the window and door trimmings could be included. Two pieces of each wall were cast so if enough interest is there, it would be possible for me to make a silicon mold and cast these as a model kit. 

Well, that basically wraps up this update.  Questions and comments are welcome below and I look forward to getting out the next update!

Thursday, July 19, 2012

Farmhouse Project WIP - Update 4 - Window Frame Copies

The silicon molds of the window frames seem to work fairly well.  I'm using the 'glass' method I learned from the HirstArts site to get nice flat backs on the frames.  Using mold release would probably help the resin to release from the plexiglass.  Alas, I have none and I'm not casting a lot so I'll keep using a razor blade to help me out.

I made a mold of the large picture window and a mold for the two regular rectangular windows. Here they are with the plexiglass pressed over them.  These frames are nearly ready to take out of the mold.


Here are the frames after being taken out of the molds.  Next step is to use the razor blade to peel them off of the plexiglass.  Using mold release would make this step a lot easier I suspect...


The top row are the polystyrene masters.  The bottom right are a couple frames that I've trimmed.  The rest are waiting to be trimmed using a hobby knife.  It is a bit tricky to prevent bubbles when pressing on the plexiglass.  Again, mold release may be helpful to get them to escape.  Fortunately, I only have had a single bubble in the small cross member that went most of the way through.  The other small bubbles I've seen should be easy to fix with putty.

At this point I'm leaning back towards filling each pane with clear resin rather than a plastic sheet of some sort.  The frames are thick enough that I don't want to stack them back to back to form the sandwich.  They would just take up too much of the wall thickness.  I'll try one each way and see which looks better.

Here is what they look like installed - after doing a bit of trimming of the window hole to allow the frame to fit.  Overall I think they will work pretty good.

Having them open would be really neat.  However, it will also expose both sides of the window and require the resin method...


Next step is to trim the rest of the window holes before finally gluing the walls down. 


Monday, July 16, 2012

Farmhouse Project WIP - Update 3 - Window Frames


Rather than go right in to assembly, I took a detour into working on the window frames seen in the reference photo (scaled up to see the detail):

Initially the plan was to make masters from styrene strips, make a silicon mold, and then cast the frames in white resin.  The thought of just scratch building each frame briefly crossed my mind as I realized each window space wasn't exactly the same size due to slight variations in the Plasticine masters for the various walls.  Although chopping very uniform pieces of styrene wasn't a problem thanks to my Northwest Short Line Chopper II, trying to glue the tiny fiddly bits took a long time and was far more tedious than pressing bricks...  Since the measurements are off by less than 1mm, I'm sticking with the initial plan and just trimming frames or brick to make the cast resin pieces fit.

Here are three of the distinctly differently sized styrene masters:

All three window frames squared up.
3/4" window for the kitchen

Main picture window
1" window


Most of the frames are constructed using quarter round or half-round styrene.  The thickest/widest pieces are 1mm.  My hope is that using the slightly rounded edges will be less prone to air bubbles.  The little cross-members are pretty thin so they still might be trouble to cast.  After a little putty and some sanding with super-fine sandpaper to smooth off any excess glue, these masters will be ready for casting.

I've never cast something so thin before and foresaw potential problems with gluing down the masters.  Normally for thicker pieces, it isn't a problem since a thin layer of glue doesn't really affect the overall thickness of the piece being cast.  These thin pieces, however, could be a problem and any glue oozing out would produce extra flashing to trim off and result in edges which are not as crisp as they could be.  Another great tip from Claude enlightened me to what what sounds like a great solution - double-stick tape!  Perhaps this is an obvious or commonly used solution to what certainly is not an uncommon problem, but it struck me as pure genius.  Anyway, I'm going to give that a try when making the silicon molds and see what comes out.


During the measurements for windows the first of what is probably several errors was uncovered.  The inset brick ledge on the picture window section of the front wall is about 1/8th of an inch too tall.  I'm not sure how I managed that, but the picture window frame I've made certainly won't fit without trimming down the bricks.  I'm not sure if I'll end up re-making the Plasticine master or just carve off some brick...  I could leave it alone as well, but would have to create another window and worse, it will look 'odd' right next to the other windows in which it shares the same pattern. 

The jury is still out as to how to add 'glass' to the windows.  One option is pouring resin into each of the 'glass' areas.  That will be a lot of work per window and I'm not sure how the end result will look.  If they look great and the process is reliable this may be the way to go.  The guaranteed up-side of using this method is that only one casting of the frame will be needed per window to look decent from the inside and out.  Another option is to sandwich a piece of transparency sheet between two resin castings.  Actually the transparency could just be glued to the inside of the frame, but it wouldn't look the best from the inside...  There are two downsides to this option.  The first is that it will take twice as many castings.  Not a big deal and I'm fine with that.  The second, however, may be the deciding factor.  Although the frames are fairly accurate in their measurements, I'm guessing they may be off a little bit.  After flipping the frame, the cross-members may be off slightly and the misalignment of the two pieces back to back may be distracting. I guess I'll just have to wait and see how the castings turn out before making a decision.

Still to create are doors, the small window next to the door, and maybe the tiny window high on one of the kitchen walls. In addition, a couple separate sections of the 1" window would be nice so some of the windows could be modeled as open.  I'll probably work on those next and hopefully get the silicon mold poured in the next day or two.

Sunday, July 15, 2012

Farmhouse Project WIP - Update 2 - Casting Complete


Pressing bricks is fun!

After limited sleep and a cloud of plaster dust, all of the castings are complete!  Due to the late hours I was working on these, there were a few mistakes causing me to re-cast and in one case re-master pieces.  Fortunately, it is relatively quick work to press out a master.  Its just a bummer to have to take a step backwards before making forward progress.  ;)


Here are the pieces including the re-cast picture-window wall.

Here they are laid out in order of how they will hook together. (sort of)


A few lessons were learned as I worked on the walls which led me to re-master and cast the multi-picture window wall.  Refrigerating the Plasticine sheets before cutting out window pieces is a great idea.  Claude gave me this tip awhile back, but I had underestimated how much more accurate it could make the pieces.  This, along with using a straight razor to cut the pieces, made building the window inserts much easier and more accurate.  I also had forgotten to add the wood beams on the top.  Although I could have just used real balsa strips, I figured since I was re-doing the piece anyway it would be a time saver to just get the beams in there now.  The end result is much better in my opinion:
Re-made picture window.


Another lesson learned was that rather than having to use the scroll saw to cut 45 degree angles on the edges of most pieces, I could just create a 45 degree wedge and use it as one of the edges of the cast.  It turned out to save a little plaster, provide a more accurate and reproducible 45 degree angle, and of course save the time of having to cut the pieces.  Turns out I should have made more than one set of them since having my single set in use proved to be the bottleneck in more than one instance...

45 degree wedges.  The more commonly used 2" wedges were in use at the time.
Wall section ready for pouring - the 45 degree wedges are in place on each end.

The 45 degree cast angles can be seen here which allow the cutting step to be skipped.
It definitely took some thought, patience, and time, but as I mentioned in my previous post this method of building terrain has the potential to produce some fairly neat pieces in a relatively short amount of time. 

Although there wasn't as much time as usual for sleep, I was sure to make time for church this morning.  We're in a series talking about Genesis and that we are created in the image of God and reflect his attributes.  I particularly like reflecting this particular wavelength of light - God must have had a lot of fun creating the universe!  Please don't read this wrong - I'm not comparing my skills to that of our maker or do I have any sort of god-complex...  I just see this hobby as an outlet for the creative energy God put within myself and other artists - the same energy musicians, writers, and [insert your hobby here] have.


Yes, pressing bricks is fun, but it will be nice to take a break from it and look forward to the next step - assembly of the walls!