Sunday, September 30, 2012

TAG African Modern Militia 28mm Figures

I found The Assault Group's Modern Militia 28mm Figures to be an excellent fit for Ambush Alley's "Down on the Farm"  scenario from the Bush Wars Force on Force expansion.  They are properly armed according to what the scenario has laid out and fit well with the figures I have from Eureka that will be used along side these.

Rhodesian Guard Force - armed with Lee Enfield rifles - front

Rhodesian Guard Force - armed with Lee Enfield rifles - back

Rhodesian Civilian Farmers - armed with shotguns - front

Farmers - armed with shotguns - back

The pose of the guy on the left is really neat - looks like he is getting ready to look from around a corner or peek out a window.

I'm really pleased with these sculpts and will definitely keep TAG in mind in the future.

Monday, September 24, 2012

Fields of Honor Rhodesian Test Board Layout

Lots of photos to share in this update.  Most everything is done for the convention and the photos below show the tentative board layout planned for Fields of Honor coming up this weekend.  There are actually two more boards planned that would fill in the driveway to take place of the two regular landscape boards that I'll be using instead.  The additional road boards were cut from the plan partially due to time constraints and mostly due to the worn thin patience of my wife.  I guess I don't blame her since I've pretty much been working on building terrain non-stop every evening for the past couple months.  Anyway, what has been built turned out pretty decent and hopefully it will be fun to play on.  Enough preamble, here are the photos.

Overview of the farm compound
Overview of the board layout

View from between the storage buildings to the house

Night shot.

View of the chain link fence.

Storage building attached to office/machine shed

Side of the carport

Front of the house through the barb wire topped chain link fence


Front gates

Side door

Storage buildings

Back of one of the storage buildings next to a burn pit

Approaching the compound from the front gates


The 28mm miniatures to be used for the planned scenario have also been painted and just await their final seal.  I'll try to get them photographed and posted sometime soon.

Additional photos with outdoor natural lighting will be added when I get the chance as well.  The better lighting will be good to show the details of the individual pieces. 

Monday, September 17, 2012

Storage Buildings - WIP

Yet another side-track project has been lurking along with the other projects.  These storage buildings were actually the first of this brick-pressing method that I cast.  They have been a hidden prototype that I've been worked on in parallel to the other projects.  I just haven't been taking any pictures of them.

The roof sections were actually the last pieces to be made as they were something I had done before and was already comfortable with working the tin.  The walls of the buildings still need some additional weathering, but otherwise are fairly complete.  Below is the first (and only at this point) photo of the framed up roofs.


As with the other buildings I've been making lately, this one is also based off of an actual structure over in Africa.  Unfortunately, the owner of the photo I had in mind requires a license fee to show the photo directly.  His work is definitely deserving of pay - it just doesn't work in my hobby budget.  It is a pity as Robin Hammond has some really spectacular photos and it would have been nice to show his work inline with this post.  Hopefully this remote link to the photo doesn't suddenly break as these things tend to do on the internet...  Anyway, the photo is from the recent and ongoing struggle between the farmers in Zimbabwe and their government.

Some progress was made on the farmhouse, carport, and fence sections over the weekend as well, but I didn't manage to take any photos.  Lots of things are coming together, but there are also still lots of details to finish up before the convention in less than two weeks.

Monday, September 10, 2012

Farmhouse Project WIP - Update 11 - Painting and Mortar


Lots of photos for this update.  Painting is pretty much complete.  As with the car port, I mixed the Slate and Titanium White Earth Pigments (2-3 parts slate to 1 part white) to be used as the mortar.  A little variation in the mortar color probably isn't a bad thing so I didn't used a measuring spoon to get an exact measure.  Given the inexact method of mixing mortar on the ground and measuring things 'by the wheelbarrow full' as we did in Zambia, my approximations here are on par.  I did, however, mix a big enough batch to at least finish the house so the color will be consistent on this project.  It turns out this mix was a little too white so I ended up giving the house a dusting of Natural Umber (not pictured) to tone down the white a bit. 


Here are a few shots of the house pre-mortar:


Here things are post-mortar:

The 'glass' for the windows was installed as well.  I did end up just using transparency sheet (which can be purchased from the FedEx Office shops by the sheet) and cutting it to the right size to cover the entire window frame.  Cutting individual panes would be a pain so I opted for this shortcut to save what is left of my sanity.

Here is a series of photos with the windows and doors sitting in the holes.  They aren't glued yet because the house still needs a final coat of Liquitex Matte Varnish.


The doors still need handles, but otherwise are ready for installation.

By the way, there is a such thing as too much gloss varnish when applying it to make the removal of excess weathering powder.  I got carried away with it on the house even after practicing which made it difficult in places to get any mortar at all to stick.  Overall I think it turned out, but it took way too long to get it to this stage (compared to the car port which was fairly quick & easy).
Looking back at the photos above, I can hardly tell there is 'glass' in the panes.  That is probably due to the abysmal lighting in the basement where the workshop is.  In better lighting there should be some glare and/or reflection.  This should be especially the case when the roof is put on making it dark inside the building.

The covers that go above some of the windows still need to be worked on and the windows/doors need to be glued in place - some of which may need a little filler to take care of some small gaps.  The base needs a little flock and I'd really like to add the Rhodesian Boiler, but it will have to go in the 'details if there is time' list.  There are still several fence boards, a board of three storage buildings, and hopefully a driveway board to work on.  Bits of all of them have been started, but there is still a lot left to do on them in the next three weeks...

Farmhouse Car Port - WIP Update 1

The car port is shaping up nicely.  Tin for the roof has been attached, the base is painted, and a little weathering & detail work is getting there.

The door and window still need a final coat of paint and weathering. Glass for the window is cut, but can't be installed until after the frame is completely painted.

I'm not sure how it happened, but the back corner of the roof warped a little bit which is a little annoying, but is what is for now...

The roof still needs to be painted and, as I mentioned in a previous post, it will serve as the testing grounds before doing the roof of the house.

Some additional weathering on the walls to tone down the white a few notches may be helpful.  I'll wait until I take it out of the dark basement and into some better light before going down that path though.


The base still needs some grass and maybe some bushes.  Also, the reference photo shows some junk laying on the side of the building.  I'll probably try to add that as well, but will hold off until some of the other more required to-do items are complete.  Countdown to Fields of Honor, Fall 2012 (September 28-30th) is getting a little tight for comfort and some details may go unfinished before I'm running a game at Fields.

Wednesday, September 5, 2012

Farmhouse Car Port - WIP

Again, I've been sidetracked on a different, yet related, project.  I decided to build the car port seen in another photo of the area around the house.  The garage is serving as a great prototype to test out the new brick painting technique on a little larger scale than the small test pieces used previously.  My theory that a smooth gloss seal vs the more rough Testor's Dullcote will make it easier to apply the grout and reduce the chalk look turned out to be true.

First, here is the reference photo:
Image from http://www.nrzam.org.uk/BobEglinton/BobLHS.htm

It would be great to find a 1/48th-1/60th scale model of the pictured vehicle, but I'm not sure what model it is nor am I aware of anyone who would make such a thing.  If anyone is aware of how to get one, please comment below.

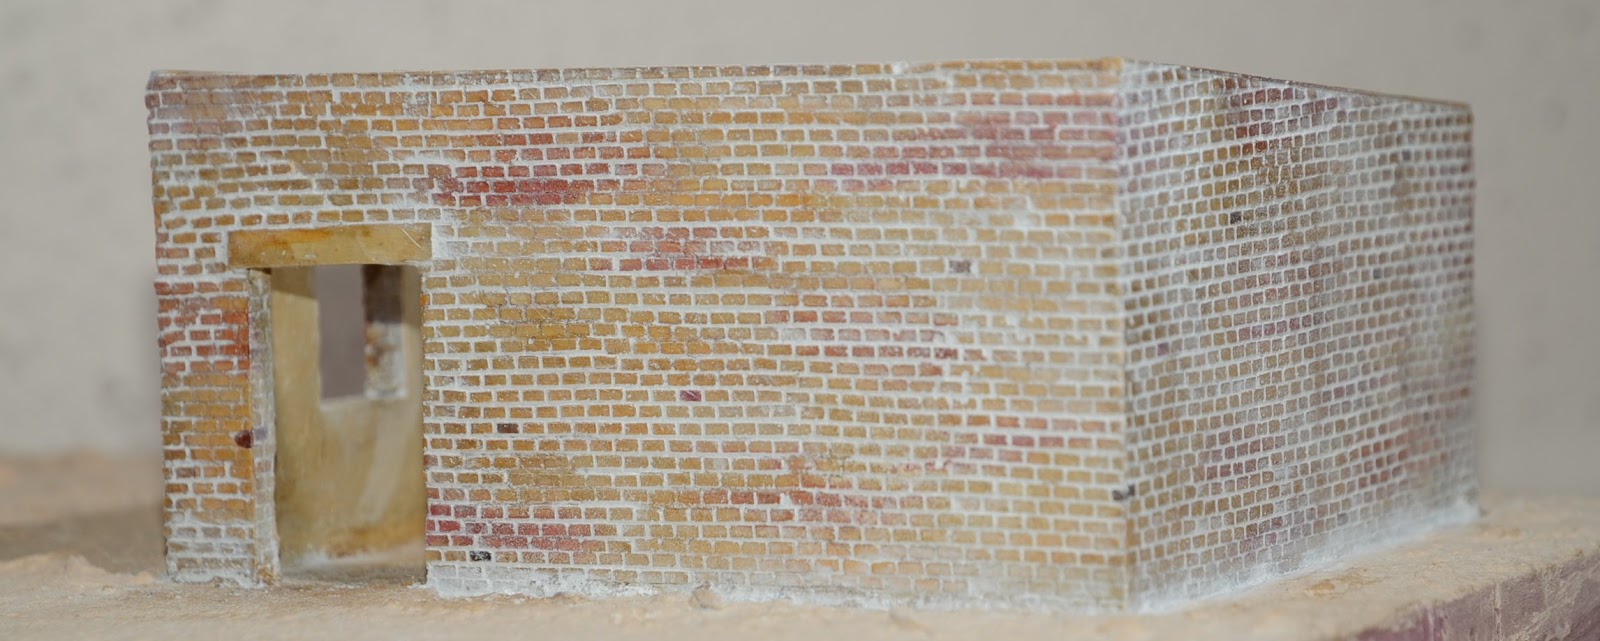
Here are some photos of the building after the weathering powder had dried.  Once the ground gets a little color, I think the building will look pretty nice.
Front
Back

Left Side

Right Side
The walls are not completely done yet.  As seen in the reference photo, there is a reddish stain along the bottom parts of the walls due to the rain falling on the Zambian soil.  I'll try to replicate that with some Terra Cotta weathering pigment.  I then plan to seal everything with Liquitex Matte Varnish applied with an airbrush.  I've read that using Testor's Dullcote or many other varnishes has significant negative effects on the pigments.  Ounce per ounce, the Liquitex product will be less expensive than the Testor's anyway.

Here is how I colored the walls:

  1. Base coat the walls with Delta Ceramcoat Sandstone.
  2. Using a foam brush, gently brush on streaks and/or areas of Golden Brown, Burnt Sienna, and Dark Cherry.  Note that the foam brush is used sort of as a drybrush with most of the paint wiped off on a paper towel before applying to the wall.
  3. Using a small brush (about as wide as a brick is), paint a few random bricks with white, Burnt Umber, and any of the other colors already used.  
  4. Wash the entire wall with a Sepia wash.  I mix my own using Les' Wash Recipe over at AwesomePaintJob.com.
  5. Seal with a clear gloss varnish from a spray can after the paint has had sufficient time to dry (I let it wait overnight before sealing).
  6. Wait for the varnish to dry (probably overnight again) and apply pigment with a dry brush liberally to the first wall face. The wall will need to be lying in a horizontal position so the pigment doesn't just fall off.
  7. Rub the pigment into the recessed grout lines with a finger.  There will be some residual pigment on the brick faces which we'll take care of later.  The pigments I use are non-toxic so I just use my bare finger - use gloves if you are using something that is toxic...
  8. Apply rubbing alcohol with a different brush by dipping the brush in the alcohol and then just barely touching the face of one of a brick and letting the fluid wick into the recesses.
  9. Give the alcohol a minute to start to set up and then go back with a slightly damp paper towel and gently rub the brick faces to remove excess pigment.  You will need to keep using new areas of the towel to avoid smearing pigment all over.  This part can get a big messy, but worked better than I expected.
  10. Move on to the next wall and repeat steps 6-9. 
The pigments I'm using are from Earth Pigments by the way.  The grout is their 'Slate' mixed with some Titanium White.

Below is the balsa roof frame all ready to have tin applied.  The balsa is glued together with Loctite Super Glue Gel which works great for this type of application. Next I'll put the tin on the roof and then continue to use it as a painting prototype to learn from.
Roof Frame

Progress on these projects has been a bit non-existant in the last couple weeks due to me being out of the country on a mission trip.  Purely by coincidence, I happened to be in Zambia not more than 30km away from the house pictured in the photos.  I wasn't able to get to see it (or what is left of it), but being able to see some of the landscape, buildings, and the people was a real blessing.  The physical reason for me being over there was to build a pump house and water tower with the help of the people of a local village.  Strangely enough, some of my model making experience was actually useful in helping lay the blocks for the real pump house.  To the right is a photo that I took of my brother and one of the guys from the village in front of the tower we built.  We didn't know what exactly we would be doing before we got there and the tower went from design to as-pictured in about 8 days.  It was quite a challenge given the material and tool shortages we had.  From end to end it was a great experience and I hope this source of clean water will bless the village for a long time to come.