Monday, September 10, 2012

Farmhouse Car Port - WIP Update 1

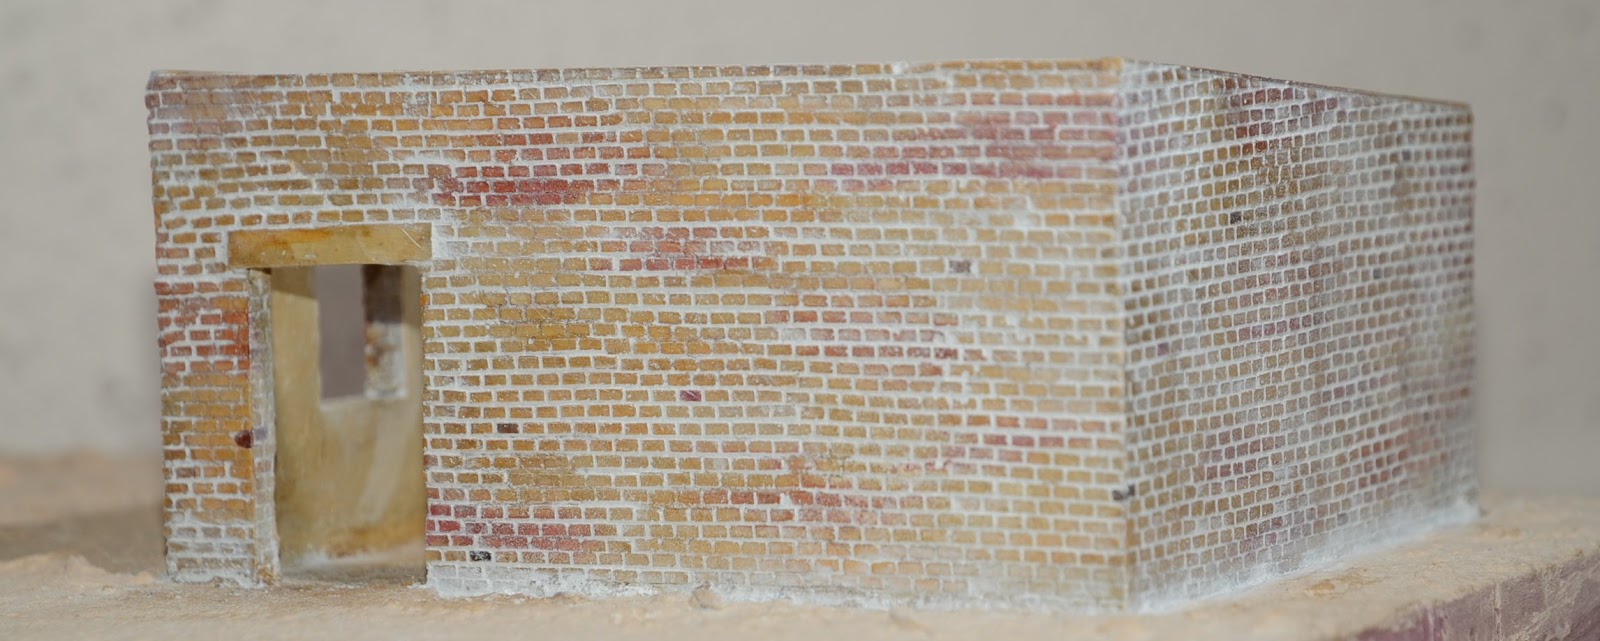
The car port is shaping up nicely.  Tin for the roof has been attached, the base is painted, and a little weathering & detail work is getting there.

The door and window still need a final coat of paint and weathering. Glass for the window is cut, but can't be installed until after the frame is completely painted.

I'm not sure how it happened, but the back corner of the roof warped a little bit which is a little annoying, but is what is for now...

The roof still needs to be painted and, as I mentioned in a previous post, it will serve as the testing grounds before doing the roof of the house.

Some additional weathering on the walls to tone down the white a few notches may be helpful.  I'll wait until I take it out of the dark basement and into some better light before going down that path though.


The base still needs some grass and maybe some bushes.  Also, the reference photo shows some junk laying on the side of the building.  I'll probably try to add that as well, but will hold off until some of the other more required to-do items are complete.  Countdown to Fields of Honor, Fall 2012 (September 28-30th) is getting a little tight for comfort and some details may go unfinished before I'm running a game at Fields.

Wednesday, September 5, 2012

Farmhouse Car Port - WIP

Again, I've been sidetracked on a different, yet related, project.  I decided to build the car port seen in another photo of the area around the house.  The garage is serving as a great prototype to test out the new brick painting technique on a little larger scale than the small test pieces used previously.  My theory that a smooth gloss seal vs the more rough Testor's Dullcote will make it easier to apply the grout and reduce the chalk look turned out to be true.

First, here is the reference photo:
Image from http://www.nrzam.org.uk/BobEglinton/BobLHS.htm

It would be great to find a 1/48th-1/60th scale model of the pictured vehicle, but I'm not sure what model it is nor am I aware of anyone who would make such a thing.  If anyone is aware of how to get one, please comment below.

Here are some photos of the building after the weathering powder had dried.  Once the ground gets a little color, I think the building will look pretty nice.
Front
Back

Left Side

Right Side
The walls are not completely done yet.  As seen in the reference photo, there is a reddish stain along the bottom parts of the walls due to the rain falling on the Zambian soil.  I'll try to replicate that with some Terra Cotta weathering pigment.  I then plan to seal everything with Liquitex Matte Varnish applied with an airbrush.  I've read that using Testor's Dullcote or many other varnishes has significant negative effects on the pigments.  Ounce per ounce, the Liquitex product will be less expensive than the Testor's anyway.

Here is how I colored the walls:

  1. Base coat the walls with Delta Ceramcoat Sandstone.
  2. Using a foam brush, gently brush on streaks and/or areas of Golden Brown, Burnt Sienna, and Dark Cherry.  Note that the foam brush is used sort of as a drybrush with most of the paint wiped off on a paper towel before applying to the wall.
  3. Using a small brush (about as wide as a brick is), paint a few random bricks with white, Burnt Umber, and any of the other colors already used.  
  4. Wash the entire wall with a Sepia wash.  I mix my own using Les' Wash Recipe over at AwesomePaintJob.com.
  5. Seal with a clear gloss varnish from a spray can after the paint has had sufficient time to dry (I let it wait overnight before sealing).
  6. Wait for the varnish to dry (probably overnight again) and apply pigment with a dry brush liberally to the first wall face. The wall will need to be lying in a horizontal position so the pigment doesn't just fall off.
  7. Rub the pigment into the recessed grout lines with a finger.  There will be some residual pigment on the brick faces which we'll take care of later.  The pigments I use are non-toxic so I just use my bare finger - use gloves if you are using something that is toxic...
  8. Apply rubbing alcohol with a different brush by dipping the brush in the alcohol and then just barely touching the face of one of a brick and letting the fluid wick into the recesses.
  9. Give the alcohol a minute to start to set up and then go back with a slightly damp paper towel and gently rub the brick faces to remove excess pigment.  You will need to keep using new areas of the towel to avoid smearing pigment all over.  This part can get a big messy, but worked better than I expected.
  10. Move on to the next wall and repeat steps 6-9. 
The pigments I'm using are from Earth Pigments by the way.  The grout is their 'Slate' mixed with some Titanium White.

Below is the balsa roof frame all ready to have tin applied.  The balsa is glued together with Loctite Super Glue Gel which works great for this type of application. Next I'll put the tin on the roof and then continue to use it as a painting prototype to learn from.
Roof Frame

Progress on these projects has been a bit non-existant in the last couple weeks due to me being out of the country on a mission trip.  Purely by coincidence, I happened to be in Zambia not more than 30km away from the house pictured in the photos.  I wasn't able to get to see it (or what is left of it), but being able to see some of the landscape, buildings, and the people was a real blessing.  The physical reason for me being over there was to build a pump house and water tower with the help of the people of a local village.  Strangely enough, some of my model making experience was actually useful in helping lay the blocks for the real pump house.  To the right is a photo that I took of my brother and one of the guys from the village in front of the tower we built.  We didn't know what exactly we would be doing before we got there and the tower went from design to as-pictured in about 8 days.  It was quite a challenge given the material and tool shortages we had.  From end to end it was a great experience and I hope this source of clean water will bless the village for a long time to come.


Tuesday, August 14, 2012

Chain Link Fence - WIP


I got sidetracked from the farm house project to work on another related project.  For the 'On the Farm' Force on Force scenario I'm planning to run at Fields of Honor (September 28-30th 2012) there is a fence included on the map.  There are lots of examples out on the web with various levels of success in creating realistic looking fencing in 28mm scale.  I tried using piano wire to simulate the metal frame, but the wire was difficult to cut and refused to be exactly straight.  It was also miserable to try to get to stay square while trying to assemble it.  After various trials and errors, I came across Dennis Brennan's chain link fence product.  It was the most realistic I had come across.  I ordered the kit and was quite impressed with Dennis' customer service and prompt shipping.  I ordered on Friday and it showed up on Monday.

The only negative was the lack of information on shipping.  The cart showed $0 for shipping/handling and I was charged a little over $5.  It wasn't any more than it cost him to ship, but the lack of shipping costs on the web site should probably be addressed.  Again, Dennis' great customer service came into play and he said it would indeed be added as soon as he could.

Below is a photo of a completed 6" length of fence which is 2" high.  On top of each of the metal posts is a piece of angled polystyrene which will eventually hold a couple strands of barbed wire.  The polystyrene is not included in the kit and is something custom I added on.  I'm still not sure how exactly to do the barbed wire, but I do have a couple ides.  Any thoughts on exactly what to use for the barbed wire would be appreciated...


I won't go into too much detail related to the contents of the kit, but I ended up not using the fabric intended to simulate the chain-link.  The fabric included in the kit has larger diamonds and is better suited to the O-scale train (1/48th) than the 28mm (1/60) I needed it for.  In 1/60th scale, the holes represented by the kit fabric is about 5" which is a bit large...  As part of my previous trials, I had picked up some tulle (used in wedding veils, dresses, etc).  The fine diamond shaped threading looked to be a good approximation of chain-link, but without a frame to hang it on, I was kind of stuck.  The kit fabric is a bit stiffer than the tulle which would be nice when attaching it to the frame, but I opted for the tulle just due to the scale difference.  The real value of the kit (to me at least) is in the instructions and the jig.  Out of respect for Dennis, I'll leave it at that with regards to details on how it exactly works.  All I will say is that it is fairly simple, yet ingenious.  It keeps things lined up and makes it a lot easier to assemble the frame.


The nearly completed section seen in the photos is one of two pieces that will form a corner on a 12"x12" board.  The right side of the fence will be at the edge of the board and is assumed to continue on into the next board.  The left side is the corner of the fence and a similar piece will be placed at a 90 degree angle.  I'll also be making a couple 24" straight pieces as well as a 24" section with a gate.  The kit includes the makings for working gates which is pretty neat.  This feature is another reason to fix the rest of the gates into place just to prevent something from breaking, but it may still work in a removable fashion.

Below is a photo with a 28mm Rhodesian Light Infantry trooper from Eureka (here is the USA version of the site).  From what I have read, fences such as these were built around the immediate area of the farmstead during the years of the Bush War as well as after.  Apparently they help by prematurely detonating or catching RPG rounds within the mesh.  The fence also hinders rushing attempts from those attacking. 

You may need to click on the image to see the full sized version to see the chain-link detail.


There is another inch of metal post sticking down into the foam holding the fence in place.  I hope to be able to make each fence section removable, yet still maintain the seamless look.  That may not be possible and they may have to just be permanently fixed to the boards...which means more of a storage issue since each board will need its own box.  Different problem for a different day.

The soldered connections of the fence posts and supports is reasonably strong, but I'm not sure how well it will stand up to being removed from the board and handled when being deployed and stored.  If any of the joints break they will be difficult to repair by soldering since they are already painted.  It may have been best to just use styrene rods of various thickness for the frame rather than the metal versions, but styrene may not be rigid enough to give the netting enough support to keep it flat.  Perhaps another trial for another day...

It was kind of fun putting the fence together.  It does, however, take a lot of patience and it wasn't inexpensive especially since I didn't already have a decent soldering gun.

EDIT(9/20/2012): The day for testing out the styrene option came and went.  In short, it works great.  Much easier than soldering.  The Testor's Liquid Cement I'm using takes a little while to form a strong bond, but other than the additional wait time, using styrene is much better than using metal.  Another great feature of the styrene is that the frame is much more flexible and will resist breaking unlike the rigid metal frame.  The metal would be great for a static train display that won't be handled, but for gaming terrain, a little more flexibility (and ease of repair) would be nice.  The styrene is plenty rigid, however, to hold the fabric in place.  I'll post some photos of the completed fences yet this week I hope.

Monday, August 6, 2012

Farmhouse Project WIP - Update 10 - Roof Tin Part 2

The roof is mostly constructed and is just in need of some tin to cover the roof joints which will make it look a little less rough. After that the tin will be painted using the hairspray weathering technique to give what ever I use as the primary color a pealing look to show the metal underneath. 

Front

As-is, the brick is base-coated with Sandstone (from Delta) and the first couple layers of ground cover have been added.  I'll still be painting up some additional test chunks to work out the kinks in my brick painting technique before moving forward with the house itself. 

By the way, the chimney is just stuck into the roof hole and not yet properly aligned.  It is kind of sticking out at an odd angle which will go away when it actually gets glued into place.  The little peak in the photo below will have a finishing façade to make it look a little more like the original. 

Back

Each of the window frames has also been base coated and will get the hairspray method to give it a weathered look.  It is probably overkill to weather such small details using this method, but I'd like the practice. I'm still waffling back and forth between resin and the transparency sheet for the window glass...  I still need to actually get some transparency and try it out to see how it looks, but there is still plenty of time to figure that out.

The lighting isn't great in the photos as they are just some quick snaps, but at this point in the project it really does look rather bland.  Simply getting the window frames put in place will make the whole structure a lot more appealing, but that won't happen until everything is painted.

Sunday, July 29, 2012

Farmhouse Project WIP - Update 9 - Roof Tin

Tinning the roof has begun.  Below are some of the tools I'm using for the job:

On the top left is an orbital sander that I borrowed from a friend of mine.  With all the use I've gotten out of it, I probably should just buy him a new one...  I did buy a new set of sand paper so I'll at least return it to him in good condition.  The sander is used to remove the printing on the tin and rough up the other side as well to give the glue and eventually paint something to grab on to.

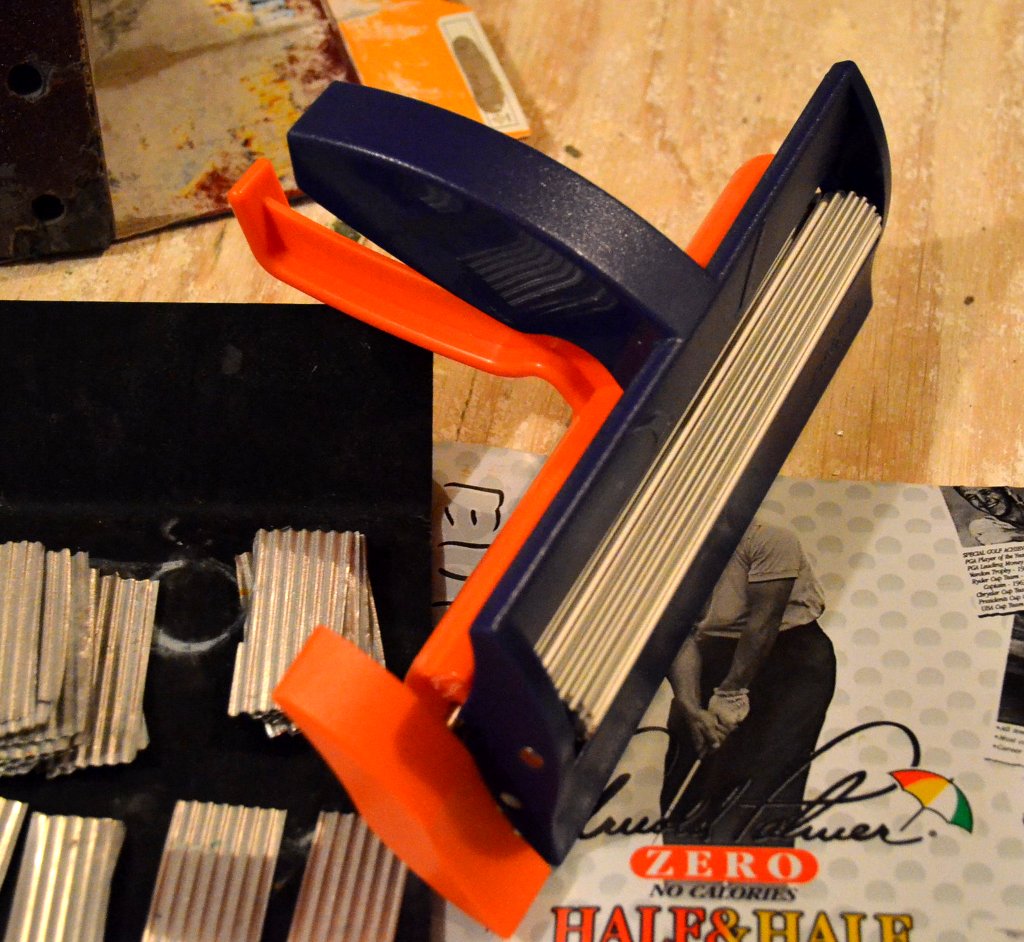
Here is the Fiskars Paper Crimper. It creates the nice corrugated pattern in the tin.  Under the crimper is the tin from the can of an Arnold Palmer drink.  It is a favorite drink of my parent-in-laws.  Although a little taller than a standard 12oz can of soda, both work equally as well.  Not pictured, a Kitchen Shears similar to the one linked, was used to cut the beverage container apart.  Do not use the household shears for this!  Cutting tin isn't its designed function and although it will cut dozens/hundreds of cans apart without fail, it will be significantly traumatized by the experience and will never cut the same again.  If you do have one in the kitchen, you might consider buying a new one and swapping it out for the old one.  The old one can then migrate to the hobby tool chest and the kitchen can take advantage of a shiny brand new one.  Win-win for all involved. ;)

Moving on, the glue I use for this step is Gorilla Super Glue. It is less expensive per ounce than the Loctite I use for gluing the balsa together, has more working time, and forms a little better bond between the tin sheets.  The extra working time requires the use of clamps and clothes pins to keep the pressure on the pieces long enough for the bond to form.  I highly recommend wearing disposable gloves and a respirator when working with the Gorilla Glue.  I happen to be somewhat allergic to the fumes so the 3M Respirator I purchased allows me to work with the stuff safely.  Getting the glue stuck to my fingers (which is inevitable when working with so much of it for so long) is extremely irritating and painful to get off so the gloves are a big help.  Plus, the gloves help prevent getting poked and cut by the sharp edges of the tin.  Ok, enough talk about safety equipment...

Applying the bottom row of tin.  I've started on two sides to allow me to trade back and forth as one piece dries, I can work on the other side.  It normally only takes 30 seconds or so for the glue to grab, but sometimes I get a little carried away and put too much glue on which takes a few minutes to set up...


About half of the first row is done in this photo.  The black clamps shown in the photo are extremely helpful in working on the second and subsequent rows.  Their long reach and point pressure makes the tin so much easier to deal with.  Specifically, they are Wolfcraft QUICK-JAW Needle Nose Spring Clamps.  I got mine from Menards.

Here the bottom layer of tin is complete.  It took about two hours to go from tin can to the first layer glued down.

The round black things on the right side of the frame are magnets.  Another pair of them are on the underside of the roof.  They are working to press together a particularly troublesome pair of tin sheets long enough for the glue to set up.


So far the roof is shaping up quite nicely.  Another couple hours and it should be all tinned up.  Most likely I'll forget to leave a hole for the chimney, but I'm hoping that writing it here will help me to remember. ;)

Farmhouse Project WIP - Update 8 - Roof Framed

The 'hard part' is done - framing the roof.  Ok, so it really wasn't that difficult, but it certainly wasn't an exact science.  The Sketchup drawing helped out to give some hints on how long the beams should be, but due to slight variations in wall length and alignment along the way, some trial and error was needed.  Fortunately there is a little wiggle room when getting things lined up given the flexible nature of the metal roof.

The beam seen down on the floor of the building was previously attached to the bottom of the roof peak.  It was used to keep the correct roof height which was sort of the constant value used in getting the rest of the roof pulled together.


As can be seen along the bottom edges of the walls are going to be what I believe are rain gutters.  The walls along the concrete areas in the source photo seem to be tarred or somehow sealed against water penetration.  That should add some interest to the long stretches of brick.


To hold the balsa wood frame together, I use Loctite Super Glue Control Gel.  It dries very quickly (too quickly sometimes) and forms a solid bond.  Trying to do this with white glue would make it very difficult to get things put together in any reasonable amount of time.  If I had the tin ready, I could have begun attaching it about 10 seconds after as I glued the last cross timber in place.


Next getting some tin on and remembering to leave space for the chimney is on the todo list.

Thursday, July 26, 2012

Farmhouse Project WIP - Update 7 - Experiments Followup

Well, lots of 'error' in my 'trial and error'.

The resin window experiment flopped in more than one way.  First, the resin somewhat sticks to the wax paper which leaves some paper residue on the back of the window ruining their clarity.  Second, the resin sticks - a lot - to the double-stick tape.  That one didn't surprise me I guess...although I had some hope since the silicon didn't stick to it at all.  The wax paper frames both suffered from seepage of the resin under and out of the frame.  Although it was easy to trim off when still semi-soft, it still left a thin sheet of clear resin on the back side of the frame - exactly what I was trying to avoid.  There is another test I'll likely try with the resin to avoid the seepage, but the transparency option is gaining favor.

Ok, on to the painting tests.  So far I've got four options painted up.  None of them strike me as 'that is the one', but a at least one looks promising.

Below are a few photos.  Keep in mind you can click on the photos to expand them for a more detailed view.  Pardon the odd wall shapes...as I mentioned before, these were poured with extra plaster as I was casting the walls. 

The option below has no pigment in the mortar lines at all.  This option actually looks a little better than the photo shows, but it still leaves something to be desired... 
Country Gray base, red/browns sponged on, sepia wash to bring it together

The option below used Gray pigment in the mortar lines.   I didn't seal this one before applying the pigments which resulted in the gray pigment sort of overpowering the brick face colors...  It looks kind of interesting and has an 'old brick wall' feel, but does not match brick on the house I'm looking for.

Country Gray base, black wash, red/browns sponged, Slate pigment

The example below is actually three variations on the same base coat.  The left has the white pigment pressed in to represent the mortar, the center is no pigment, the right is gray pigment.  Even though I sealed this piece before applying the pigments, they both really overpowered the brick color.  To me, the white is too light and the gray is too dark.  I actually kind of like the center portion where there is no pigment, but it still doesn't look quite right.
Country Gray base, red/browns sponged, sepia wash, white pigment left, slate pigment right

The final option so far is the one I believe that best represents the original house.  The left 2/3 has a Sandstone base coat with the standard red/brown sponging plus some single bricks picked out in highlight colors.  The right 1/3 has a Mudstone base coat (a bit darker than the sandstone) with the same paint scheme as the left portion.

It still looks a little 'chalky' even though I sealed the piece before applying pigments.  Maybe a thicker coat of sealer would help.  I tried wiping as much of the pigment off the tops of the bricks as I could with a wet paper towel, but it wasn't entirely successful.  The grout pigment is a mixture of about 2 parts slate, 1 part white.

Anyway, I guess I'm leaning towards the sandstone side, although it may be interesting to paint random areas with the darker Mudstone to give some variation in color.  The two seem to blend pretty well.

Sandstone(left 2/3)/Mudstone(right 1/3), red/brown sponge, sepia wash, gray/white mix pigment
same as above except without the flash on


Below are some photos of the house I'm modeling after.  Keep in mind that the walls of the house are a little more uniform and may better represent the original brickwork.  The test pieces are from a different mold I'll be using for another set of related buildings.  I think the last option above best represents the top left photo on the wall (where the kids are hanging out).


Images from http://www.nrzam.org.uk/BobEglinton/BobLHS.htm
Well, more than ever I could use some feedback on these options.  I'm too close to the problem to see clearly at this point...  Figuring out how to get rid of some of the 'chalky' look would be ideal I think.  Alternatively, I could scrap all of these tests and try something completely new.