Pressing bricks is fun!
After limited sleep and a cloud of plaster dust, all of the castings are complete! Due to the late hours I was working on these, there were a few mistakes causing me to re-cast and in one case re-master pieces. Fortunately, it is relatively quick work to press out a master. Its just a bummer to have to take a step backwards before making forward progress. ;)
 |
| Here are the pieces including the re-cast picture-window wall. |
 |
| Here they are laid out in order of how they will hook together. (sort of) |
A few lessons were learned as I worked on the walls which led me to re-master and cast the multi-picture window wall. Refrigerating the Plasticine sheets before cutting out window pieces is a great idea. Claude gave me this tip awhile back, but I had underestimated how much more accurate it could make the pieces. This, along with using a straight razor to cut the pieces, made building the window inserts much easier and more accurate. I also had forgotten to add the wood beams on the top. Although I could have just used real balsa strips, I figured since I was re-doing the piece anyway it would be a time saver to just get the beams in there now. The end result is much better in my opinion:
 |
| Re-made picture window. |
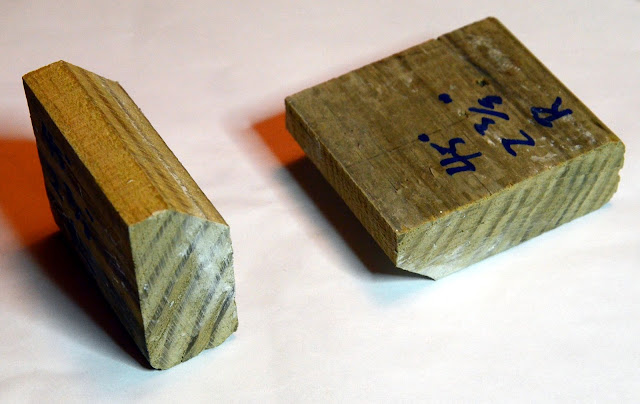
Another lesson learned was that rather than having to use the scroll saw to cut 45 degree angles on the edges of most pieces, I could just create a 45 degree wedge and use it as one of the edges of the cast. It turned out to save a little plaster, provide a more accurate and reproducible 45 degree angle, and of course save the time of having to cut the pieces. Turns out I should have made more than one set of them since having my single set in use proved to be the bottleneck in more than one instance...
 |
| 45 degree wedges. The more commonly used 2" wedges were in use at the time. |
 |
| Wall section ready for pouring - the 45 degree wedges are in place on each end. |
 |
| The 45 degree cast angles can be seen here which allow the cutting step to be skipped. |
Although there wasn't as much time as usual for sleep, I was sure to make time for church this morning. We're in a series talking about Genesis and that we are created in the image of God and reflect his attributes. I particularly like reflecting this particular wavelength of light - God must have had a lot of fun creating the universe! Please don't read this wrong - I'm not comparing my skills to that of our maker or do I have any sort of god-complex... I just see this hobby as an outlet for the creative energy God put within myself and other artists - the same energy musicians, writers, and [insert your hobby here] have.
Yes, pressing bricks is fun, but it will be nice to take a break from it and look forward to the next step - assembly of the walls!
Ryan,
ReplyDeleteBeautiful work!
It also appears that you "re-scaled" to have the pieces in lego-block units (instead of inches). :D
I look forward to seeing how you do the roof!
Cheers,
- Jim
Thanks Jim! Although I had considered re-scaling, I decided against it primarily due to the 45 degree angled wedges. Since I wanted to use those to prevent the need of cutting, the Lego blocks wouldn't be able to connect anyway. It is all for the better - now I'm free to use any dimensions that best fit the project rather than having to think inside the 'Lego box'. ;)
ReplyDeleteYes, the roof will be interesting. I'm planning on making a corrugated metal roof with balsa 'rafters'. It is possible that the Sketchup model was more difficult to create than the actual roof will be - now at least I have all of the measurements for the skeleton.